

Article by
Frank Sweeney
A pool enclosure mold removal service in West Palm Beach typically begins by identifying the affected areas and moisture source, then containing and cleaning the mold and drying the space. The Florida Department of Health says homeowners can often clean moldy areas under about 10 square feet, while larger or recurring problems should be handled by a professional. Mold is persistent, so wiping away what’s visible without addressing dampness can leave the problem ready for an encore.
It’s understandable to want a clear plan before mold turns a relaxing pool area into an unwelcome project. Remediation involves more than scrubbing: the approach depends on where mold is growing, how far it has spread, and what is keeping the surface damp. Containment helps limit disturbance during removal, while correcting the moisture source can reduce the chance of recurrence.
This guide explains the remediation steps, what can affect an emergency response, and how insurance may apply. You’ll also learn how containment and moisture control fit into treatment, so you can understand what needs attention and why.
Key Takeaways
- Start by identifying the mold’s extent and what is keeping the enclosure damp; the right cleanup approach depends on both.
- The Florida Department of Health says homeowners can often clean moldy areas under about 10 square feet, while larger or recurring problems should be handled by a professional.
- Emergency response depends on the severity of the affected area and whether active moisture is still reaching it.
- Insurance coverage may depend on the cause of the water damage and the terms of the policy, so understanding the source matters when documenting a claim.
- Compare DIY cleanup with professional remediation by considering containment, safe removal, and whether the moisture source can be addressed.
What Is the Mold Remediation Process?
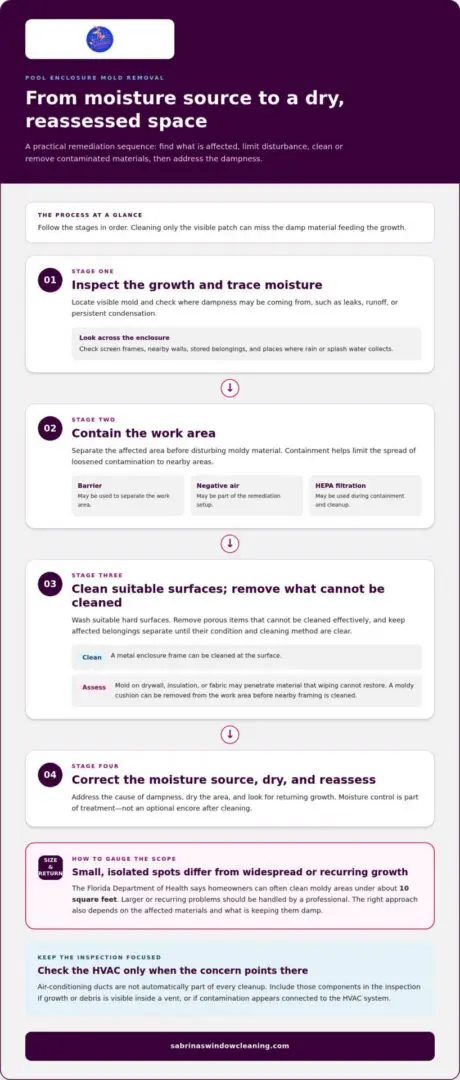
Mold remediation follows a practical sequence: inspect the enclosure, contain the affected area, remove contamination, clean salvageable surfaces, and correct the moisture problem. In a West Palm Beach pool enclosure, the inspection should include screen frames, nearby walls, stored belongings, and places where rain or splash water collects. Cleaning only the visible patch can miss the damp material feeding the growth.
Start with the size and recurrence of the problem. The Florida Department of Health says homeowners can often clean moldy areas under about 10 square feet, while larger or recurring problems should be handled by a professional. A small, isolated spot on a washable surface may suit careful household cleaning. Growth across multiple surfaces, repeated returns, or affected porous materials calls for a broader assessment.
Containment helps keep disturbed material from spreading into nearby areas during removal. A remediation setup may use a barrier, negative air pressure, and HEPA filtration. The work area is separated, and cleaning proceeds from affected surfaces through removal and drying. This matters in a screened pool space, where airflow can carry loosened contamination toward furnishings or the home’s adjoining rooms.
- Inspect: Locate visible growth and trace moisture to sources such as leaks, runoff, or persistent condensation.
- Contain: Separate the work area before disturbing moldy material.
- Clean or remove: Wash suitable hard surfaces; remove porous items that cannot be cleaned effectively.
- Dry and reassess: Address the moisture source, dry the area, and look for returning growth.
Structural elements and belongings need different handling. A metal enclosure frame can be cleaned at the surface, while mold on drywall, insulation, or fabric may penetrate material that wiping cannot restore. For example, a moldy cushion can be removed from the work area before nearby framing is cleaned. Keep affected items separate until their condition and cleaning method are clear.
Air-conditioning ducts are not automatically part of every mold cleanup. If growth or debris is visible inside a vent, or contamination appears connected to the HVAC system, the inspection should include those components. Cleaning an unrelated duct system adds work without addressing mold on a wet screen frame or wall. Focus first on where moisture and visible growth actually occur.
Florida Statute § 489 distinguishes work requiring a licensed contractor from minor repairs that do not. The applicable requirement depends on the work involved, so mold cleanup and any separate construction repair should not be treated as the same task.
Mold on a pool enclosure should be treated as a potential health concern. Avoid brushing visible growth into the air. Instead, contain the area and use careful cleaning practices to avoid spreading contamination.
How quickly can you respond to a mold emergency in West Palm Beach?
In a West Palm Beach mold emergency, first control active water and describe where mold is visible. A dripping pipe, water entering through a screen, and a dry patch on an enclosure call for different next steps. Share the source, affected locations, and whether dampness is continuing. Clear details help a remediation team understand the urgency without playing detective with a soggy clue trail.
Arrival time and project duration are separate questions. Mold remediation projects in West Palm Beach can take from 1 to 7 days or more, depending on severity. That timeframe covers the work, not how soon a team arrives. The affected materials, spread, access, moisture correction, and any restoration needs shape the schedule. A single accessible area differs from mold affecting adjoining surfaces and belongings.
Different options serve different needs. An inspection or testing professional can assess a suspected hidden issue, while a remediation company handles cleanup. If growth is visible across an enclosure and nearby materials, a remediation team can assess those areas together. If the concern is an odor or possible growth behind a surface, an inspection can help locate the issue before work is planned. Mold doesn’t respect job descriptions, but the scope should be clear.
Compare proposed plans by what they include, not just by who can arrive first. A useful scope identifies affected locations, explains how the work area will be managed, and addresses the moisture source. Ask whether testing is recommended for the specific concern and how the findings would affect the cleanup plan. Testing can inform an assessment, but it doesn’t remove visible growth or stop water entry.
- Active water: Describe whether a leak or ongoing water entry is still affecting the enclosure.
- Visible spread: Identify affected surfaces, materials, and adjoining spaces.
- Insurance records: Photograph the damage and keep notes about the water event.
- Access: Explain how crews can reach the enclosure and affected areas.
These details help define what needs attention first and what can follow. They also distinguish moisture control from later restoration, such as repairing damaged materials. Keep the description factual and preserve records of the water event and visible damage. Insurance decisions depend on policy terms and cause, so good notes are useful without turning cleanup into a paperwork obstacle course.
The price depends on the case and is provided after a quote request. Factors include the affected area, materials, containment, testing, moisture correction, and restoration needs. A written scope clarifies which work is included and how the proposed sequence addresses the problem. Start by describing active moisture and visible spread, then request an assessment and remediation plan. Mold is an unwelcome guest; a clear work plan helps show it the exit.
Is mold damage covered by insurance?
Insurance coverage for mold damage depends on the policy and the water event behind it. An inspection record, photos, and a clear repair scope help document the damage and connect it to its cause. Mold itself doesn’t come with a handy label saying “covered,” so the details of the water event matter.
Inspection and Damage Assessment
A useful assessment records where mold appears, which materials are affected, and whether water is still present. Around a pool enclosure, document screen frames, nearby walls, stored cushions, and adjoining interior surfaces. Photograph the areas before repairs begin, and keep an inventory of damaged belongings. Specific notes give an insurer and restoration team something concrete to review, rather than a vague report that mold appeared “somewhere by the pool.”
Mold Growth After Water Damage
Mold colonies can establish within 24-48 hours after water exposure. After a leak, storm, or overflow, record when the water event occurred and when mold first became visible. Check seams, shaded corners, and spaces behind stored items, where moisture can linger. A simple timeline helps explain the sequence of damage during an insurance review, and is much more useful than relying on memory’s famously creative filing system.
Coverage depends on policy wording and the cause of the water damage. A sudden leak, storm intrusion, and long-term dampness can be treated differently under policy terms. Read the relevant sections, including exclusions and limits, and describe the event accurately. Don’t assume mold cleanup and repairs have identical coverage: the policy language determines how the claim is evaluated.
Keep the paperwork orderly before restoration starts. Save dated photos, notes about the water source, inspection findings, and estimates or invoices. Separate cleanup records from repair records. For example, list damaged drywall removal separately from its replacement. A clear sequence shows what addressed mold, what corrected the water problem, and what restored the space. It’s not thrilling reading, but neither is reconstructing the timeline from a camera roll.
Repairs should follow the assessment. Stop the water source, then clean or remove affected materials and dry the area. Next, determine whether enclosure components, nearby finishes, or belongings need repair or replacement. A stained wall may need more than paint if moisture remains behind it. Covering the mark before addressing the cause is a cosmetic disguise, not a restoration plan.
Restoration depends on the materials involved. A damaged cushion requires different handling from a wall finish or enclosure component. Keep belongings awaiting assessment separate from items ready to return, and store inspection and repair records together. That paper trail makes the path from water damage to completed restoration easier to follow.
Mold containment and moisture-source correction
Containment limits disturbance during cleanup; moisture correction addresses what allows mold to return. In a pool enclosure, trace dampness around the affected surface and nearby materials. Check whether rain enters through a damaged screen, splash water gathers near stored items, or condensation keeps a shaded corner wet. These clues help focus the work. Mold may be persistent, but it doesn’t need an invitation in every corner.
Before cleanup, separate the affected work area from nearby spaces. A remediation setup may use a containment barrier, negative air pressure, and HEPA filtration to help limit the movement of airborne material. Move furnishings outside the work boundary when possible. For example, shift a dry patio chair away from a moldy frame before work starts. The chair can enjoy a brief change of scenery.
Match containment to the location and task. A small patch on an exterior frame differs from growth beside an open doorway or indoor wall. Identify the route between the affected surface and adjoining rooms, then keep people and belongings clear. Avoid brushing or dry-scrubbing visible growth before the area is prepared. It’s not the moment for an impromptu dust cloud.
- Find the moisture: Look for leaks, water entry, poor drainage, or repeated wetting near the affected surface.
- Prepare the area: Separate the work zone and move nearby belongings before cleaning begins.
- Address materials: Clean suitable hard surfaces and assess porous materials that absorbed moisture.
- Dry and observe: Let the area dry, then watch for recurring dampness or visible mold growth.
Moisture-source correction may involve repairing a leak, improving drainage, or changing how water reaches a wall. If rain blows through a damaged screen and wets the same corner, cleaning alone leaves the cause in place. Homeowners can keep indoor humidity between 30 and 60 percent to help prevent mold damage. That supports prevention, but it won’t fix water entering around the enclosure. Mold is stubborn; it doesn’t take hints from a freshly wiped surface.
Choose cleaning methods based on the material. A hard, nonporous frame may be cleaned, while damp fabric or other porous belongings need separate assessment. Drying matters, too. Returning cushions to a persistently wet corner gives the mold problem a familiar address. After cleanup, check the original moisture route, including the screen, nearby wall, and any floor where water collects.
Keep the area clear until surfaces are dry and the moisture source is controlled. Recheck the same corner after rain or regular pool use. If growth returns, note where it appears and whether materials feel damp. That comparison can reveal whether the moisture issue remains active. It’s a useful check, and far less awkward than repeatedly introducing mold to the same spot.
DIY vs professional pool enclosure mold removal costs and results
DIY cleanup may suit a small, isolated patch on an accessible, washable surface. A homeowner can clean that spot and observe whether it returns after the area dries. Professional remediation is more appropriate when mold recurs, affects several materials, or appears beyond the visible surface. The difference is scope: a quick wipe treats what’s visible, while a broader assessment considers affected materials and moisture.
Compare the full work involved, not just the cleaning supplies. A DIY attempt may involve cleaner, cloths, and time, but porous belongings or concealed dampness can complicate the result. Professional project pricing depends on the affected area, material type, containment needs, moisture correction, and restoration work. The price depends on the case and is provided after a quote request. A narrow spot on a frame and growth affecting nearby walls require different scopes.
Results also depend on whether the moisture source is addressed. Cleaning a screen frame while rain continues entering through a damaged section can leave the same corner vulnerable. A complete plan, by contrast, identifies the water route, cleans or removes affected materials, and allows the area to dry. A spotless surface is not a lasting result if dampness remains behind it.
- DIY may fit: A limited patch on a hard, reachable surface with no recurring moisture.
- Get a professional assessment: Growth returns, spreads across materials, or appears near an adjoining room.
- Compare scopes: Look for inspection, containment, cleanup, drying, and moisture-source correction.
- Protect belongings: Separate affected cushions or other porous items before cleaning nearby surfaces.
For example, a homeowner may spot a small patch on an exposed aluminum frame. If the frame is accessible and the spot stays isolated after cleaning, a simple approach may be suitable. If growth also appears on a damp wall or stored fabric, the job involves more than wiping metal. A professional can assess those different materials and define what needs cleaning, removal, or repair.
DIY efforts can become more costly if repeated cleaning leaves the moisture source untouched. A professional scope may cost more initially, but it can include steps that a surface-only cleanup misses. Neither approach should treat paint or a fresh-looking finish as proof that underlying materials are dry. Track whether the same area becomes damp again after rain or routine pool use.
After remediation, keep nearby exterior surfaces on a regular maintenance schedule to limit accumulated grime. Plan routine exterior care once cleanup and drying are complete.
Sabrina’s Window Cleaning: Window Cleaning
After mold cleanup and drying, Sabrina’s Window Cleaning can help refresh exterior windows. Clean windows make it easier to enjoy a well-kept pool area, while pressure washing can address suitable exterior surfaces as part of broader property maintenance. These services complement remediation, but they don’t replace mold removal or correction of the moisture source.
Consider window cleaning after cleanup if glass next to the enclosure has collected grime or water marks. Once the affected area is dry and the underlying moisture issue is addressed, exterior window care can help restore a tidy finish around the pool space.
For a fresh start on your home’s exterior, contact Sabrina’s Window Cleaning.
Make the Next Step a Clear One
Once the enclosure is dry and the mold issue has been addressed, turn your attention to maintaining the surrounding exterior. A clean, cared-for space is easier to enjoy and inspect, while regular attention can help you notice new water entry before it becomes another unwelcome project. For mold removal itself, choose a pool enclosure mold removal service in West Palm Beach that addresses the affected area and its moisture source.
Sabrina’s Window Cleaning provides related exterior upkeep through Window Cleaning and Pressure Washing. Hurricane Shutter Installation is another option for preparing your home for storm season. These services support property maintenance, but they are separate from mold remediation, so keep each task focused on the work it requires.
Decide what your property needs next, whether that means clean windows after remediation or exterior upkeep around the enclosure. Contact Sabrina’s Window Cleaning to discuss its exterior services. A thoughtful next step can help you enjoy a fresher, better-cared-for space.
Frequently Asked Questions
How is a mold test done?
A mold test usually involves collecting an air or surface sample for analysis. The inspector first identifies the concern, such as visible growth near a pool enclosure or a musty smell indoors, then chooses a sampling method suited to the location. Testing can help investigate suspected hidden contamination, but it doesn’t replace addressing visible mold or moisture. Ask what the sample is intended to determine and how the results will guide next steps.
How long does it take to get rid of mold in a house?
Removing mold from a house can take from 1 to 7 days or more, depending on the affected area and severity. A small, accessible patch may involve less work than contamination across several rooms or materials needing repair. Drying and restoration can add time after cleanup. For example, a damp wall may need assessment and repair after removal, while a cleanable surface may be ready sooner.
How much does it cost to get rid of mold?
The cost depends on the affected area, materials, containment, moisture correction, and any repairs or restoration. The price depends on the case and is provided after a quote request. A small patch on a hard surface involves a different scope from growth affecting porous materials in several rooms. Compare estimates by checking what each includes, such as inspection, cleanup, drying, and repair work, rather than comparing a single total alone.
What do professionals use to kill mold?
Professionals use cleaning methods and products suited to the affected surface and material. A hard, washable surface may be cleaned, while porous material with mold growth may require removal rather than surface treatment. Containment equipment can also help limit spread during cleanup. The important distinction is that wiping or killing visible growth alone doesn’t correct dampness: the moisture source and any affected materials still need attention.
How do professionals remove mold from pool enclosures?
Professionals assess the enclosure, prepare the work area, clean or remove affected materials, and address the moisture source. For example, growth on an accessible frame requires a different approach from mold on a damp adjoining wall or fabric cushions. The work should account for nearby doors, belongings, and surfaces that could be affected during cleanup. After cleaning, drying and checking the original moisture route help determine whether further repairs are needed.
How long does professional pool enclosure mold removal take?
Professional mold remediation projects can take from 1 to 7 days or more, depending on severity. A contained area with accessible surfaces can take less time than a project involving multiple materials, drying, or restoration. Pool enclosure access, the location of moisture, and the amount of cleanup also shape the schedule. Ask for the proposed work sequence so you can understand how assessment, removal, drying, and repairs fit together.
Disclaimer
All articles are designed to entice you to hire Sabrina's to clean your windows, not to teach you how to clean them. They are meant for entertainment purposes only. We are not responsible for the out come of your DIY cleaning project!