

Article by
Frank Sweeney
A pristine living room can’t distract from a front walk auditioning for a jungle documentary. Preparing a rental property for new tenants with exterior cleaning in Clearwater starts outdoors: clear clutter and leaves, tidy weeds and lawn, and clean suitable exterior surfaces where grime has built up. Complete repairs and messy work before the final clean so fresh results last through move-in day.
A clean exterior helps make a good first impression, but it’s only one part of a thoughtful turnover. Focus on the outdoor areas that need attention, decide where window cleaning or pressure washing fits, and note what cleaning cannot fix. Then inspect and document the property before handing over the keys. A final walkthrough can catch both overlooked maintenance issues and walkways that need attention.
Key Takeaways
- Finish repairs and other messy work before scheduling the final exterior cleaning, so freshly cleaned surfaces stay that way.
- Clear outdoor clutter and leaves, tidy weeds and lawn, and consider pressure washing surfaces that need attention.
- During the final walkthrough, check that exterior areas and walkways are safe and that any turnover supplies have been removed.
- Photograph and record the property’s condition before move-in, including outdoor spaces, to create a useful comparison for later.
- Remember that cleaning improves appearance but won’t fix damaged grout, failed caulk, leaks, broken fixtures, or permanent surface damage.
1. Budget-friendly upgrades and exterior pressure washing
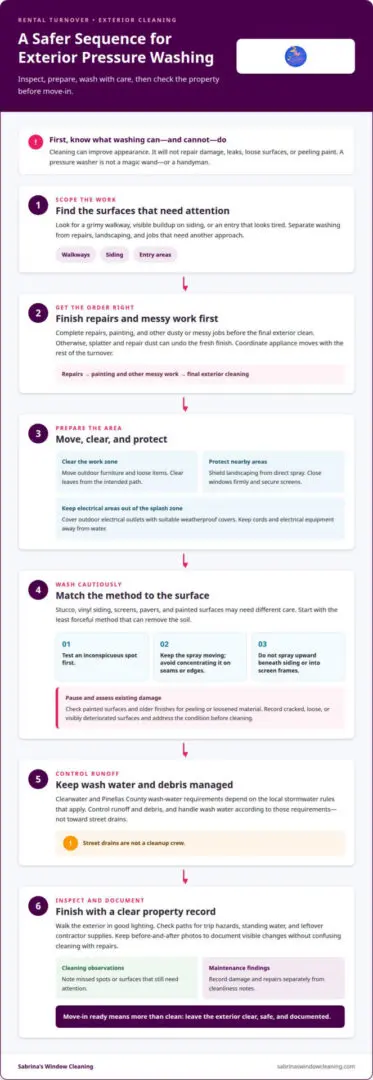
Between tenancies, pressure washing can refresh suitable surfaces without turning every turnover into a renovation. Start by identifying what needs attention: a grimy walkway, visible buildup on siding, or an entry that looks tired beside a clean interior. A focused checklist helps distinguish surfaces that need washing from repairs, landscaping, and jobs that require another approach, because a pressure washer is not a magic wand (or a handyman).
Plan the work in the right order. Complete repairs, painting, and other messy jobs before scheduling exterior cleaning. Otherwise, paint splatter or repair dust can undo the fresh finish. Coordinate appliance moves with the rest of the turnover, then keep photos of the property before and after cleaning. The images help document visible changes without confusing cleaning with repairs.
Clearwater and Pinellas County wash-water requirements depend on the local stormwater rules that apply. Control runoff and debris, and handle wash water according to those requirements rather than letting it flow toward street drains. The drain is not a cleanup crew.
Prepare the work area before washing begins. Move outdoor furniture and loose items, clear leaves from the intended path, and protect landscaping from direct spray. Close windows firmly, secure screens, and cover outdoor electrical outlets with suitable weatherproof covers. Keep cords and electrical equipment away from water. These steps help prevent avoidable mess and keep vulnerable areas out of the spray zone, where they can stay safely out of the splashy action.
Use a cautious approach on stucco, vinyl siding, screens, pavers, and painted surfaces. Start with the least forceful method that can remove the soil, and test an inconspicuous spot before treating a larger area. Keep the spray moving instead of concentrating it on a seam or edge. Avoid directing water upward beneath siding or into screen frames. Check painted surfaces and older finishes for peeling or loosened material first, since pressure can worsen existing damage. A little restraint beats giving the paint an unexpected exit.
Different surfaces need different care. Pavers may tolerate a different approach than painted trim, while delicate screens call for extra caution. If a surface is cracked, loose, or visibly deteriorated, record it and address the condition before cleaning. The goal is to improve appearance without turning a wash into a repair project. A careful sequence of inspection, protection, and cleaning makes the work more predictable before move-in, and keeps the pressure washer from auditioning for a demolition job.
2. Final walkthrough and quality control
Once turnover work is finished, inspect the property in good lighting, room by room. A final walkthrough catches issues cleaning alone cannot resolve, from a dripping faucet to a walkway left slick after washing. Use a written checklist to give each finding a clear next step, rather than leaving it as a mystery for the next tenant.
Start with safety and basic function. Test smoke and carbon monoxide alarms, and confirm their batteries are fresh. Check that fire extinguishers are accessible and unexpired. Open and close doors and windows, then confirm they latch and lock properly. Look at exterior walkways for trip hazards, standing water, or leftover contractor supplies. A tidy entrance should also be safe underfoot.
Inside, test lights and included appliances, including the dishwasher and washing machine. Run faucets, showers, and the toilet, and look beneath sinks for active leaks. Check heating and cooling systems before move-in. Replace burnt-out bulbs and record anything that needs repair. These checks distinguish a clean surface from a working fixture. A shiny faucet is lovely, but if it drips, it’s still a plumbing issue.
- Walk through each room under good lighting and note missed spots or damage.
- Check windows for clean glass, secure latches, and screens that sit properly.
- Confirm exterior paths are clear and safe after cleaning or other turnover work.
- Remove cleaning products, tools, and contractor supplies before the tenant arrives.
Cleaning and disinfecting aren’t interchangeable. The CDC distinguishes cleaning, which removes dirt and impurities, from sanitizing and disinfecting, which are separate processes used when appropriate. Clean visible soil first, then use disinfectant on suitable high-touch surfaces when needed, following its directions for contact time. A quick wipe that dries immediately may not meet the labeled contact time.
Finish by comparing the completed checklist against repairs and cleaning notes. If a window remains streaked after the walkthrough, arrange professional window cleaning before move-in. Record unresolved maintenance separately from cleanliness observations, and keep relevant photos with the turnover documentation. That distinction helps make later conversations about the property’s condition clearer, including any discussion involving a deposit. For alarms and carbon monoxide detectors, include their annual checks in the property’s maintenance records, then test them again after turnover work.
3. Before-and-after condition documentation
Start the record when the previous tenant leaves, before repairs or cleaning change the scene. Photograph every room and exterior space, then capture clear details of existing damage, stains, leaks, odors, appliance problems, and ordinary wear. Include wide shots that show each room and closer photos of specific marks. A photo of a carpet stain beside the doorway gives useful context; a close-up alone can be hard to place later.
Follow a consistent route through the property so the record is easy to compare. Photograph the front entry, living areas, bedrooms, kitchen, bathroom, closets, and outdoor spaces. In each room, include floors, walls, ceilings, doors, locks, windows, lighting, and built-in features. HUD move-in and move-out inspection materials cover items such as floors, doors, locks, cabinets, closets, plumbing fixtures, lighting, appliances, alarms, walls, and ceilings. Use these categories to make the inspection thorough.
Record condition in plain language beside each photo. “Small stain near the living-room window” is clearer than “floor issue.” Note whether a shower has damaged grout, a bathroom fixture leaks, or a light switch is loose. Describe what you see rather than guessing at its cause. If a repair is completed, document the result and replace the earlier condition note with a dated update in the property record.
- Photograph furniture that belongs to the rental, showing its condition and location.
- Open closets and cabinets to capture their interiors, shelves, and doors.
- Record carpet stains, worn areas, or visible damage before cleaning.
- Include exterior areas, such as the entry, paths, and yard, in the same property record.
After cleaning and turnover work, walk through the rental again. Compare its current condition with the move-in record, room by room. The move-out cleanliness should match the condition documented before the tenant moved in. Comparing records helps distinguish a new stain from one already photographed, and a cleaned surface from a repair that remains outstanding. Keep maintenance notes separate from cleaning notes so each item has a clear status.
Finish with a move-in walkthrough and keep the record with the tenancy documents. Let the new tenant review the condition notes and identify visible differences before settling in. For example, if a bathroom photo shows an intact towel bar but it is loose during the walkthrough, add that observation rather than relying on memory. Store photos with descriptive filenames, such as “kitchen-counter-before” and “kitchen-counter-after.” Clear labels turn a crowded photo folder into a useful record.
4. Cleaning scope and excluded services
Set the cleaning scope before the new tenant moves in, separating surface cleaning from repairs. A turnover clean can cover rooms, furnishings, appliances, walls, and floors. For example, list kitchen counters, cabinet fronts, refrigerator shelves, bathroom surfaces, and visible floor debris. A written scope clarifies what “clean” means and avoids expecting one visit to solve every property problem.
Include windows inside and out in the turnover plan. Interior glass may show fingerprints, while exterior panes can collect dust and rain marks. Clean window frames and sills as part of the task, but record damaged screens, loose hardware, or cracked glass separately. Cleaning improves appearance; it cannot restore a broken window or repair a failed seal.
Give carpets a clear place on the checklist. Cleaning them between tenants can address visible soil and help prepare rooms for occupancy. Move furniture where practical to expose covered sections, then document any remaining stains or worn patches. A clean carpet isn’t necessarily a repaired carpet, and existing damage belongs in the condition record even if the room smells fresher.
Bathrooms show why scope matters. Routine cleaning can remove surface grime from a shower, sink, toilet, and floor. It won’t repair damaged grout, failed caulk, leaking plumbing, broken fixtures, or permanent surface damage. Note these issues separately and arrange repairs before the next tenant arrives. Scrubbing a cracked tile harder won’t make it whole; it may only give the crack an unwanted close-up.
Apply the same distinction to appliances and other included items. Cleaning a refrigerator means addressing food residue and spills; it doesn’t confirm that the refrigerator cools properly. Cleaning an oven or wiping a dishwasher exterior doesn’t test its operation. Keep function checks separate from cleaning tasks, and record appliance problems for repair rather than marking an item complete after a wipe-down.
After cleaning, compare the completed work with the agreed checklist and note any remaining soil, repair needs, or ordinary wear. A wall scuff, carpet stain, and loose bathroom fixture are different findings, so describe each plainly. Keeping them separate makes turnover decisions clearer and helps the new tenant understand which areas were cleaned and which still need maintenance.
5. Exterior rental-property cleanup
In Clearwater, a rental’s exterior shapes the first impression before anyone reaches the front door. Preparing a rental property for new tenants with exterior cleaning in Clearwater means planning the work after repairs and landscaping. Between tenants, clear outdoor clutter, rake leaves, place garbage in proper receptacles, check for weeds, and mow the lawn. Trim hedges that block paths or hide the entry. A neat approach helps prospective renters notice the home, not a yard auditioning for a jungle documentary.
During inspection, look for visible algae, mildew, pests, and storm damage around siding, windows, gutters, eaves, patios, and walkways. Note loose materials, cracks, or signs of water intrusion separately. Washing can improve a surface’s appearance, but it won’t repair damage or address the cause of a leak.
Permit and HOA approval requirements depend on the property, the scope of work, and applicable rules. Review local requirements and association documents before scheduling exterior work.
Before move-in, prioritize the entry, paths, visible siding, windows, and outdoor areas tenants use. Clear debris and move furniture before washing. Check outdoor fixtures and screens for dirt or visible wear, and keep repairs separate from cleaning tasks. A checklist for preparing rental properties for new tenants with exterior cleaning in Clearwater should reflect the surfaces and shared spaces at that specific home.
Schedule the work around the tenant’s departure and the property’s condition. Turnover planning can begin when a tenant gives a 60-day notice of non-renewal; schedule maintenance vendors as soon as notice arrives. Complete repairs and messy landscaping first, then wash suitable surfaces and inspect the property before move-in. This order helps prevent yard debris from undoing freshly cleaned paths.
After washing, check walkways for remaining debris and safe footing. Compare the entry, windows, fixtures, and visible surfaces with the condition notes. If the property needs professional washing before the final inspection, schedule exterior pressure washing as part of the turnover plan.
Because a rental property’s exterior affects potential renters’ first impressions, landlords should address curb appeal before showing it to new tenants. Mowing the lawn and trimming hedges are useful parts of that preparation, and landlords should also plant seasonal flowers to improve rental-property curb appeal. Keep planting work clear of paths and the entry so it does not obstruct access.
Choose outdoor cleaning methods with the setting in mind. The CDC generally does not recommend disinfectant cleaning for outdoor spaces, except for frequently touched outdoor surfaces such as furniture. Keep routine exterior washing distinct from disinfecting, and account for this exception when planning outdoor furniture care. These steps can fit into a property-specific turnover plan alongside inspection and cleaning priorities.
Sabrina’s Window Cleaning
Sabrina’s Window Cleaning helps Clearwater landlords prepare exterior areas for a clean, move-in-ready handover. After repairs and landscaping are complete, the company’s exterior maintenance services can address dirty windows, buildup on suitable surfaces, roof grime, and gutters that need clearing. Choose work according to the property’s condition and the areas tenants will see and use.
Schedule exterior cleaning after messy work and before the final inspection. This sequence helps keep freshly cleaned areas clear for the walkthrough and condition photos. A tidy exterior sets the stage; your inspection confirms the rest.
Contact Sabrina’s Window Cleaning to discuss your rental property’s exterior cleaning needs.
Set Up the Next Smooth Move-In
Use each turnover to build a more consistent property-care routine. After the new tenant settles in, note which exterior areas show wear fastest, which surfaces collect grime, and what to include in the next handoff plan. These observations help prioritize future maintenance instead of making every move-in a guessing game. A clear standard for preparing a rental property for new tenants with exterior cleaning in Clearwater can also align expectations among owners, property managers, and incoming renters.
Keep a simple property-specific record of completed work and follow-up needs. Then the next turnover plan can reflect the building’s actual condition, not a generic checklist. For properties needing professional exterior care, Sabrina’s Window Cleaning offers window cleaning, pressure washing, and hurricane shutter installation.
Contact Sabrina’s Window Cleaning today to discuss your rental property’s exterior cleaning needs. A well-planned handoff starts with one thoughtful next step.
Frequently Asked Questions
What Needs to Be Cleaned Before a New Tenant Moves In?
Clean rooms, included furnishings, appliances, and visible surfaces, then address the outdoor areas tenants will use. In a Clearwater rental, that can mean wiping refrigerator shelves, removing bathroom residue, clearing the entry, and cleaning dirty exterior windows. Shared spaces matter too: check the mailbox area, porch, or access path if tenants use them. Keep cleaning separate from repairs, since a clean surface can still hide a maintenance problem.
How Can a Landlord Confirm the Rental Is Ready?
Confirm readiness with a final walkthrough that checks both appearance and function. Try each faucet, flush the toilet, test included appliances, and make sure doors and windows operate as intended. Review the property record for unresolved repairs, then check that work areas are free of tools and supplies. A simple sign-off noting the inspection date, outstanding items, and who handled them gives property managers a useful handover record.
Should you hire a professional cleaner or do it yourself?
Choose an approach based on the job’s size, available time, and the surfaces involved. A landlord may handle light tidying and easy-to-reach areas, while professional help can suit extensive cleaning, exterior windows, or pressure washing. A small unit with minimal turnover work may be manageable independently; a property with buildup across several outdoor surfaces may need more support. Keep repairs separate from cleaning whichever approach you choose.
Why do you need a rental property cleaning checklist?
A checklist helps landlords assign tasks, track completion, and catch overlooked areas before keys change hands. Make separate entries for cleaning, repairs, and function tests, so “wipe the refrigerator” doesn’t stand in for “test the refrigerator.” Include less obvious spots, such as porch corners, cabinet interiors, and window tracks. For Clearwater turnovers, a property-specific checklist also helps keep recurring exterior tasks from disappearing between busy move-in dates.
What is a typical price in Clearwater for pressure washing a rental home’s driveway, walkways, siding, and patio?
The price depends on the job and is provided after a quote request. Relevant factors include the areas to be cleaned, their size and condition, access around the property, and the method suited to each surface. A driveway, siding, and patio may need different treatment, so a flat estimate may not reflect the actual scope. Define which surfaces are included before comparing the work plan with your turnover budget.
Should a Clearwater landlord hire a licensed and insured pressure-washing contractor, and what should they verify?
Choose a qualified contractor with appropriate insurance, and verify licensing where the work or local rules require it. Review the business name, current license details when applicable, insurance dates, and whether the documented work suits the job. Ask for a written scope that identifies the surfaces to be washed and any exclusions. For a Clearwater rental, keep that paperwork with the turnover record, inspection notes, and documentation of completed work.
Disclaimer
All articles are designed to entice you to hire Sabrina's to clean your windows, not to teach you how to clean them. They are meant for entertainment purposes only. We are not responsible for the out come of your DIY cleaning project!